 They are called Tub chairs too; mine have a deep back curve that hugs you all the way around with swoop arms that curve down toward the front of the chair to join the legs at the front of the seat. Mine also need a cushion that has to be round in the back too. The upholstery is not a full cover stuffed, it’s more like an inset leaving the wood frame exposed and finished.
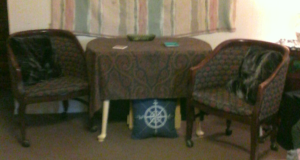
You can’t tell from that old fuzzy picture but I am in serious need of some slipcovers for my living room accent chairs, and I thought I could do it on my own.
Well it’s hard for me to say this but, uh …no I can’t. I need some instruction.
So I have been watching YouTube videos on making slip covers. One lady I was watching Kim, she is very professional and has all the tools, and fixtures to make the job run really smooth. She is a pleasure to watch, but she is far too advanced for making some quick slipcovers on the fly. But I have to say: —Understanding the right way to make all the oddly shaped pieces makes it much easier to work on the fly and with better results!
Kim, (Kimberley Chagnon) see her website here, she also teaches upholstery and will be going on tour to head workshops throughout the year, and has at least three planned for 2021.
The other lady I am watching, Marian, she has a little more “seat of your pants” style, closer to what I need to do. Her YouTube channel is Miss Mustard Seed, and I am watching her first video on making a slip cover, actually I’m on the third video as I write this post. She is just laying things over the chair and cutting, and pinning. I would have been very confused if I hadn’t watched Kim first though. Check out her website when you get a minute. But I wanted to get this little adventure down in writing because today is the day I do a blog post.
If you only see the one old picture of my chairs, that means I haven’t gotten the new ones out of my phone yet. I’m still wrestling with technology; I have a lot to learn.
In an effort to make these slipcover patterns myself… I painstakingly sandwiched the paper to the chair trying to draw the shapes and curves of the lines against my hand, and measured out the length and width. I thought I was really clever for this one… I had to make a bar compass because I realized the seat was a perfect circle at the back, and if I tried to do that free hand… well, it would be lopsided at best.
After all my pattern pieces were made I put them on the gray bed sheet I planned to use for the slip cover. I pinned them down matching the folds to the edge of the pattern where the center of the back was, first on the inside, then another pattern and for the outside. I only had a small amount gray sheet material left for the deck under the cushion so it only came half way…
Gonna have to figure something else out for that… which I just did. –I will use my freshly purchased cushion fabric to fill the rest of the deck then put the gray below that on the face of the chair under the cushion. I wasn’t going to do piping but after seeing the videos I think it will make my chairs look a whole lot better. Plus by using the cushion fabric for the piping it will have a more tailored look. I think I’m also going to keep enough of the cushion fabric, or buy more, to make some deeper cushions, the ones I have are only an inch deep and not very dense.
I posted what I have so far on facebook to get opinions, everyone likes the color, and thankfully no one has mentioned the messy look. Yes I could get the pictures on facebook but not into my post, I will, I’ll figure it out. I didn’t ask for opinions so hopefully people will be honest, without being too brutal. I only basted the seams to see how they are going to look on the chair, so now with some instruction I can start tailoring the pieces to fit my chairs better.
I am clumsy with the pins and poke myself very often, I poked myself so deep once already that I bled on the fabric, luckily it was the milling edge without color. So I marvel at how Kim and Marian of the two videos I mentioned earlier handle them and get the pieces pinned together so quickly without bleeding all over their fabric. –On my list of things to buy in the future are large pins and/or anchor pins to help make things work a little smoother.
I am used to making patterns, but for straight edged things like boxes and construction projects; curved lines were always done in my drawing and painting. So a three dimensional project with curved lines has proved more challenging, as you can see in this link to my facebook photo
I thought I could use the paper as I have for other patterns, but as it turns out I actually need a fabric, so I can either continue with what I’ve already started (my best option by the way) or I can use an old sheet to make a forever pattern… oh …and make other covers to change when the whim strikes.
Okay it’s time to get going on this I’ve a lot to do, and when they are finished I will make another post to let you see the finished chairs.